
Flute 101: Getting Started with Flute

Exciting news! I'm so glad you have chosen the flute! The flute is the sparkle of the orchestra and wind band (in my humble opinion) and there's a lot of fun repertoire out there. But before I get ahead of myself, I want to walk you through the basics of flute.

Basic Flute Care
I know you're ready to go but there are super important things to keep in mind before you start playing your flute to keep it in good shape for many years to come.
Wash your hands before you start. Especially if you have any lotion or cream on your hands.
Try not to eat 30 minutes before playing because it can gunk up your instrument
Make sure you have all the essentials need to play your instrument
A big rule we have to reiterate time and time again: Don't use your flute like a baseball bat. In all seriousness, what we mean when we say this is that the instrument, as sturdy as it looks, is quite delicate; bumping or dropping your flute can affect how the flute plays so it’s really important that we care well for the instruments.
We don’t let friends borrow flutes
we don’t leave it on our stand or chair
we don’t leave it on the floor.
It’s either in your case, in your hand, or on a flute stand.
It is easier to play your instrument when it’s in working condition so we gotta make sure we keep it safe! So lets learn a little bit about
Parts of the Flute
A standard flute has three main sections: the head joint, the body, and the foot joint. Easy enough to remember, right? The head, the body, and the foot.

The head joint: This is where the lip plate and embouchure hole are. This is where the magic happens because this is the part you blow across to make sound.
The body: This is the longest section of the flute and has most of the keys. We call this the mechanism.
The foot joint: This is the smaller end section that attaches to the body. There are other parts and mechanisms.
You will be handling all three parts when you are putting the flute together and taking it apart.
Assembling your Flute
Look, there is an art to assembling the flute: how you assemble your flute can damage or save your flute from costly repairs in the future. As long as, you follow this guide, there's nothing to worry about!
First you are going to set the case on a flat surface, or your lap. You always want to open the case with the handles flipping up. Because if you don’t, the flute will fall out.

Note: There are different types of cases but the two most common are these standard cases and French-style cases.
Once you open the case you want to start by grabbing the head joint and then grab the barrel of the body with your right hand. Because there is A LOT of key work, we don’t want to squeeze hard. I know it looks sturdy because it is made of metal but it is very delicate due to the key work and mechanisms.
When you put the instrument together, twist the part in.

You shouldn’t need any force or pressure because a properly fitted flute should go together smoothly and securely. If you feel like you have to force it in, make sure it’s lined up. If it’s still giving you problems, bring it to us and we’ll check it out for you.
Once it is securely in, align the embouchure hole to the keys. The fit should be snug.

Then you are going to do the same with the foot joint to the body. Again, using a gentle twisting motion.
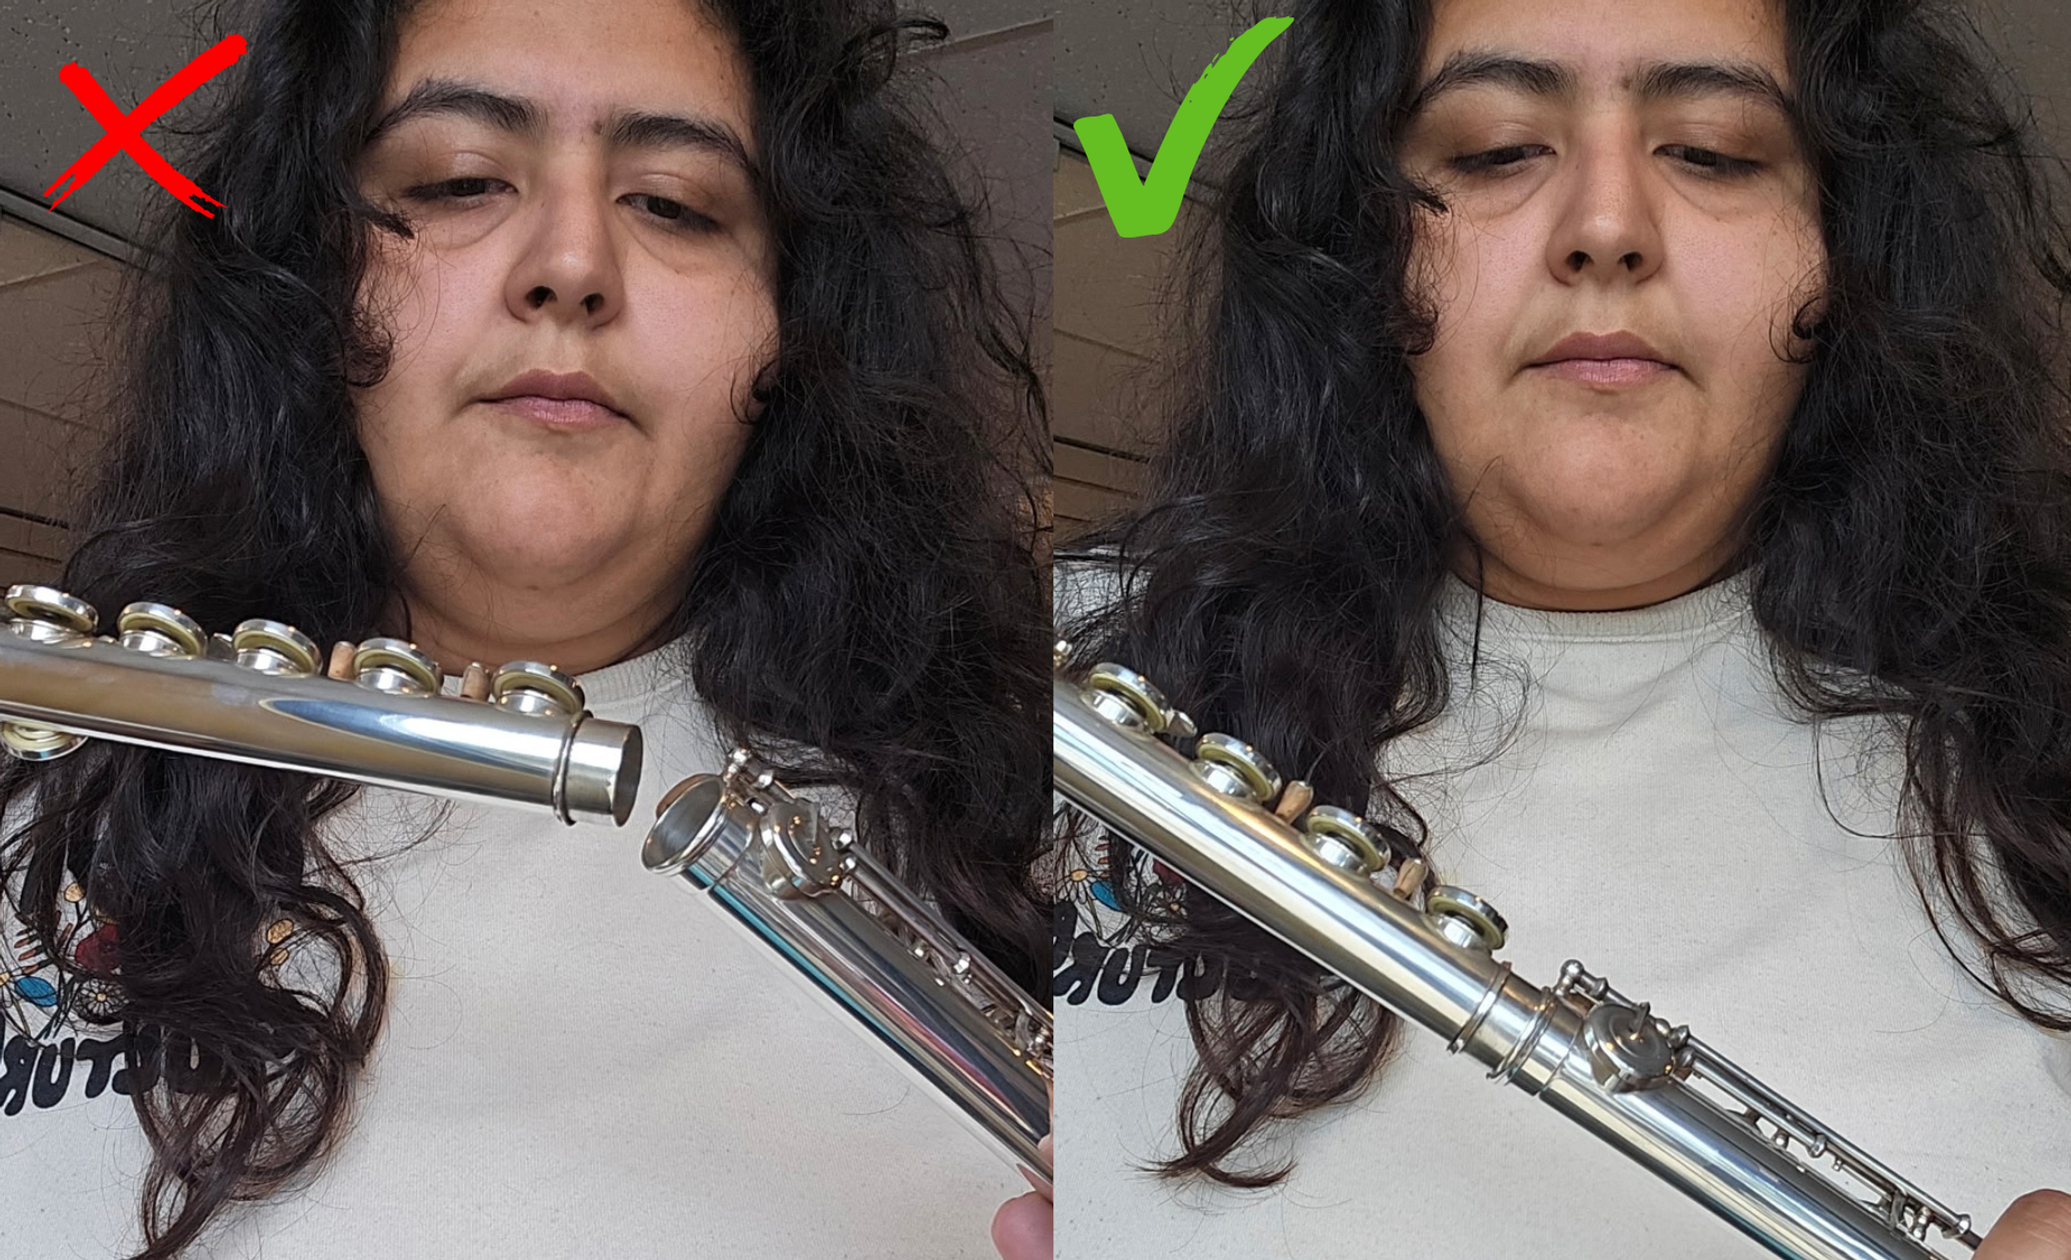
All that is left to do is to line up the foot joint!

You should be all good to go now! You can start practicing your flute now!
HOW TO TAKE APART, SWAB, AND STORE YOUR FLUTE
Okay so you just got done with a really good practice sesh or band rehearsal. Now is the most important time: We gotta swab the spit out!
I know gross but it’s not as bad as some of the other instruments. (No offense) Moisture from your breath collects inside the instrument. If you leave it there, guess what’s going to happen? Mold, smells, and gunk. Swabbing your flute doesn’t sound too bad now, does it?
In addition to gunk and smells, it will eventually affect the pads and flute’s condition and that means it's going to cost way more money for repairs. We don’t want that so after every practice session, lesson, rehearsal, or performance you need to swab your flute!
To get started, you are going to take the flute apart. I like to start by twisting the head joint out, set the rest of the flute down and swab this part. Now I have a fancy flute cleaning rod which makes life easier but more than likely you have a cleaning rod and cleaning cloth so you just need to thread the cloth through the hole and twist the fabric over the top so it has some extra cloth at the top.
Then twist the remaining cloth over the rod and push through the head joint.

You shouldn’t have to force it or anything. If it’s tough to do then adjust the cloth. Sometimes it bunches up when you are pushing it through the flute.
Once you complete that, check the instrument. If it’s dry you can place it in its case and move on.
You are going to do the same thing for the other parts. The difference with the body and foot joint is that there are keys you have to think about so try holding it from a smooth area and avoid pressing or squeezing the keys.

If you see some moisture under the pads what you can use after you have swabbed the instrument is use some pad paper and gently press through each key.
At this point, you can put it away but I use wipe the outside if I have time with a silver polishing cloth. (I will talk about that in the next section)
Before you close the case, make sure every piece is sitting properly because one of two things will happen: it will be harder to close the case if you do and second, you can damage the instrument if you don’t place it in properly. The case has some indents in them that make the placement more intuitive.

One last thing before you close the case; the only thing that should be in the case is the flute. I should not see any sheet music, pencils, snacks, or loose accessories inside the case. I will personally come and box you if you do. (I’m kidding) In all seriousness, Anything that is not intended for the case will mess up your flute and all that work you put into taking care of it is now a waste! So save yourself some cash and frustration and only insert the flute.
WIPING THE OUTSIDE OF THE FLUTE

Basically, you need a silver polishing cloth and you wipe the outside. Like I said previously, this step can be skipped especially when you have to run. In the heat of my music degree, I would wipe the outside once a week. That said, I know some people tend to produce more sweat or oils on their hand and they can't skip this step at all! So do what feels right for you or go the safe route and just quickly wipe it down.
All you have to do is wipe the flute in tiny circles and be gentle around the keywork. The flute will be sparkling if you do this! Another thing you might want to do is use alcohol wipes OR use sanitizer spray on the embouchre plate once a week to keep the mouth piece sanitized.
There is a more indepth way of cleaning your flute but I would save that for when you are the student are more familiar with the flute.

Another important thing for me to mention: The silver polishing cloth is a powdered cloth meant to polish the instrument. It is going to look kinda icky--- but don't throw it away until it is entirely black. It's supposed to do this. It's taking the tarnish of the instrument.
Like I said before, there are additional optional items that help with further maintaining your instrument and keeping it extra shiny– but we will go over that topic in Advanced Flute Maintenance.
If you got an instrument from us, we probably strongly recommended that you purchase said items but if you didn't visit us and we will help you! For now, as long as you clean it the way you are supposed to clean it, you have all that you need.
About the Author:


Comments